About Me

My photo
South Carolina, United States
Vetsy is my nickname that my family have fondly called me since my childhood. My blog reflects my personal views about the world around me. My topics may be anything that interest me but the majority of it is about my favorite past times...nature and gardening. Thank you for stopping by and leaving a comment or becoming a follower.

Saturday, May 14, 2016

A Crafty Lady Makes a Visit


Hello, My blogger, Blogging friends.  Yes it's been a while, quite a while !! I miss being here so much! I hope all is well with you all... One day I hope to be back here on a regular basis.

Anywho... A visit from a crafty lady ( Vicki Hay ) prompted this current post  and I'm so happy I'm off work today to introduce her and share her craft with you.

I find these sexy ladies  unique, bold, and contemporary.  I can see these accented in a home with a contemporary style.   Black leather furniture and large abstract paintings come to my mind, but design styles are endless and fun to explore especially when we are accenting with unique planters such as these.


 The one above is my favorite, I like the crazy curly grasses. 
  below:  I excerpted Vicki's  tips and instructions from the comment form on my May 18th, 2013 post and added the photos she provided.


Vicki:   " hi there..i made 1 also but i used a drill hole bit that makes a hole for your door handle. drilled into head still messes job then sealed polystyrene.. layered with pond liner/waterproofed added pot and plant...my lady was a black velvet head added crazy grass looks like a bad perm she looks great.....cheers

Vicki:    "if you cut the polystyrene head in half scoop out middle then use this as a mold to make concrete ones then concrete plaster bits together....or use molding clay layer over head and cut that in half for a mold to make.

Vicki  Thank you for stopping by my blog and sharing your head planters and tips with us.. Nice to meet you... "Vetsy :)

Saturday, April 12, 2014

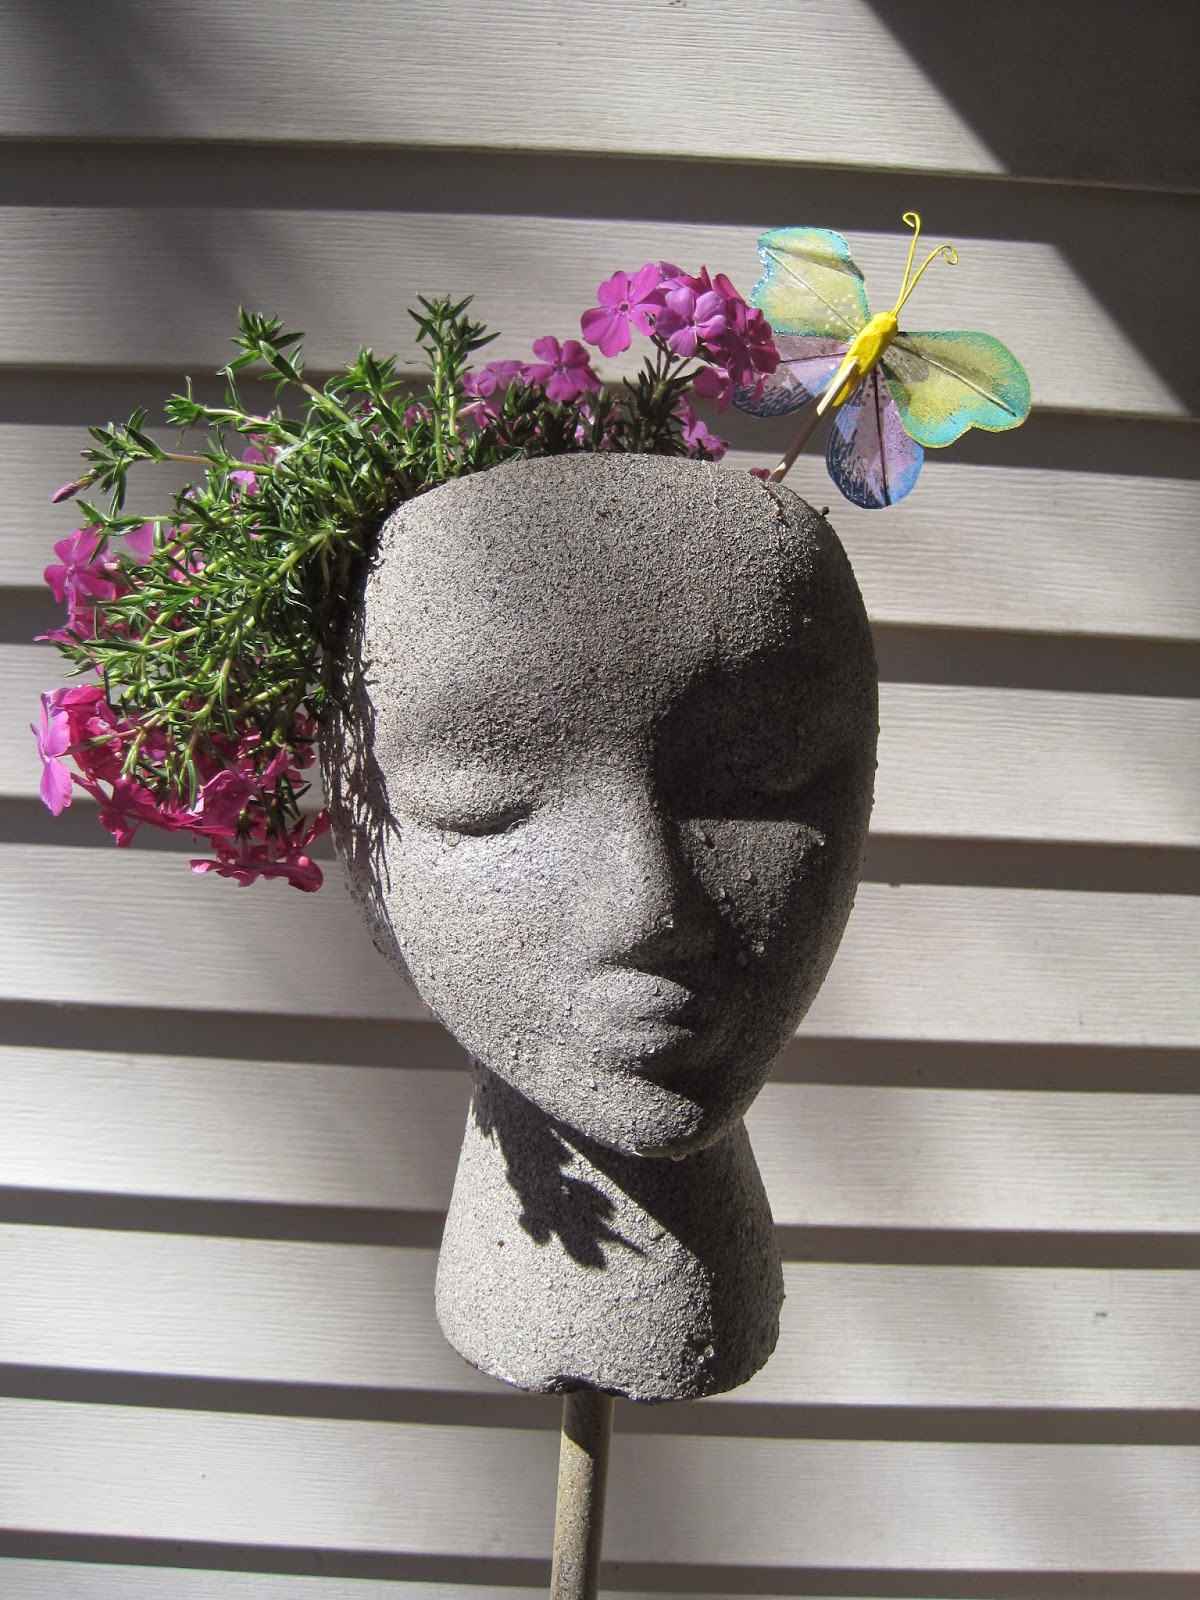
Styrofoam head planter " Ebony"


These Styrofoam head planters can really become addictive because for one, they are easy to make and 2 the ideas for creativity are endless Google it and just see what you'll find.. You'd be amazed at all the unique and creative ideas that people have come up with.


My latest is Ebony.  I followed the same steps as I did with April rose, here's that link if you missed it. http://vetsysview.blogspot.com/2013_05_01_archive.html

 but this time I added a little green tint to the face by dabbing it with Acrylic green paint. 

  I had not decided as of yet what flowers to use in her head...  But my sister came up with this idea..  She happened to have a few chickens and hens and placed one in my foam head.... and I think I like it! 

I'll watch to see how she evolves as the plants take root and spread out... The great thing about this is that I can always swop it out if I don't like it...

Thank you for stopping by.... Do leave a comment I love to hear from you.


Sunday, March 30, 2014

My second attempt with April Rose


My Foam head planter April rose was a hit with me last year. I really loved this project and I have learned a couple of things about using foam heads as planters along the way. 

Making foam head planters is fun and easy... This as I stated is the second year that I've used this planter and she has weathered last years.. Rain, heat, ice and snow... Yes snow...we did get some last year.. enough to make a few southern kids excited enough to go sit in it and make snowmen..

             Here's a young teen below, she was so excited I guess she forgot what a coat was. Snow no longer excites this Northern girl with Southern roots... I grew up in the stuff and don't care to see any more of it Ever! Not a slight dusting... Not even in a picture.


Anywho....April rose survived all of that and was fine until my neighbors across the hall who were moving knocked her over onto the sidewalk. A couple of months later I noticed that her face began to peel..


So she was due for a re-touch. I noticed after I retouched her... her features had faded. I was dumbfounded and mortified I had not the slightest idea as to how I should fix her..


Maybe, I thought to myself..... I should just paint a face on her, but that thought scarred me...

What if she doesn't look right?  adding a face would change her character and move her away from the stone like appeal that I was trying to achieve.

So in paint shop on my computer I superimposed  how I thought she may look with a painted face.. Not comfortable with this decision or the look... I posted this question to my hometalk bloggers and several of them voted... NOT to PAINT! a few others said to just give her a little shading to bring her features back out.


 I chose to shade her just a little around her nose and eyebrows with a darker grey Acrylic paint that I applied with a brush... I think I like the results... I can't wait for the plants to talk hold and cascade down the sides of her head.. I'll update as she progresses.


                        So here's what I learned .....Foam head planters can last for sometime...

 I learned that from the original creator Jessica Cramer at hometlk.com and the fact that I have her a second year..(2) They will last through all sorts of weather as long as you apply protective coating....

(3) The painting will peel if they are scrapped or knocked over. 

(4) If you re-paint a foam face.. Keep in mind that the features will fade. You maybe able to fix it...if not.. It will probably be better to start over with a new head.

(5) One can be really creative with this project...You can add all sorts of plants.. real and fake alike...
Paint faces on.. or leave it as is... Try it I bet you'll like it! and I bet you'll come up with some fabulous planter ideas.                  
                                                  Do share! I'd love to see what you create!

Sunday, March 23, 2014

Future Spring Projects starring April Rose and Friends

 
Hello my blogger, blogging friends. I hate that I'm not here as often as I would like. I hope to picks things back up in the near future... I love the benefits that blogging  has brought me...because for one, it has been a wonderful source for Journaling, meeting new friends and learning new things.

 This is also why I joined Hometalk.com a home and garden hub for people who enjoy DIY projects.
So between hometalk and blogger I'll be posting when time permits.. So without futher ado here's the latest.

I had to re-paint April Rose... ( photo above)  she was knocked over last winter by some neighbors who were moving and she began to peel.  If you are not familiar with her, take a look by clicking below:
.http://vetsysview.blogspot.com/2013/05/diy-garden-head-project.html


Here she is re-painted with her friend on the balcony. It is raining to day so my plans  to complete them are on hold..  April rose is in the background to the left, her friend is on the right.


 I purchased Bamboo poles to hold them up, I don't now why I didn't think to do this last year with April rose she may not have been so easy to knock over.


Candytuf and purple creeping phlox wait to adorn their heads. I chose these because they have trailing habits and I like them... I hoping that these will have room to spread and grow.. I didn't consider the depth and space .. I have a habit of purchasing things that I like so I'm not sure if these will work in their heads..But the good news is I can swop them out..... Stay tuned and Thanks for stopping by and leaving a comment..

Sunday, December 22, 2013

Should more than one Christmas Cactus share the same pot?

http://www.hometalk.com/2750411/potting-more-than-one-christmas-cactus-in-the-same-pot

HI my fellow blogging bloggers this is a question that I posted on my hometalk page click the link above to learn more...Do leave a comment... Thanks I'd love to hear from you... Merry Christmas!


Thursday, July 25, 2013

A Little Whimsy


I like a little Whimsy here and there...but I do not like it everywhere" LoL!
 I sound like the Cat in the Hat!


Whimsical characters add a little fun to the garden, porch, patio, or where- ever you chose to place them. There are so many cute little characters both big and small ...It can be hard not to over do it!
For example: I like cats, dogs, kids, birds, bird houses..Suns, Moons, turtles, frogs, Chickens, Roasters, Cows,...Dare I go on! Where would I place them all!


What about you? What Whimsical characters do you like?  Below are three little ladies that I have recently collected I love their little faces.


Lisa likes snails...Notice her hair..she looks like a little bug herself


    Janet likes Ladybugs and apparently a lot of water.. 


Sharon is a rose queen.. She likes climbing roses the best because they have less thorns...


Thanks for stopping by..Do live a comment and have a great day!


Sunday, June 16, 2013

Cleveland Park


I  took a short stroll through my local park yesterday and took a few photos of the creatures found their from time to time. The geese are regulars here at Cleveland Park.... The two below kept  an eye out for enemies as their gooselings feed in the small marsh out of sight...


   Some of the little ones came out in the open to graze...


    Mommy Duck and her little ones....


A scared little bunny....

I  don't know if bunny rabbits are regulars or not because this is the first time that  I have seen them here.. I watched two young bunnies chase each other around and round in little circles, I tried to catch that action on my camera but  by the time I got close enough to take a snap shot they scattered.  The only reason I was able to get  the one below is because it was too afraid to run


I tried to stick around long enough to take more photos but the animals got tired of me trying to sneak behind them for snap shots  and went else where..So I ended the evening with this photo..


Thanks for stopping by...


Saturday, May 18, 2013

DIY GARDEN HEAD PROJECT


Photo credit: Stone Face Creations

I was browsing the internet last year looking for garden inspiration and came across a photo of these fabulous garden stone planters .   Wowed by them, I had to find out where to get one, and if I couldn't find one how could I replicate one?   I posted that question on a site I joined last year called hometalk.com it's a website where home owners, crafters, designers and others share DIY projects. I got quite a few helpful responses.

A home improvement guy suggested  a MAKE YOUR OWN STONE FACE KIT. 
 I liked the faces but, didn’t care for the kit.  From the other contributors I learned that I could purchase these fabulous planters online and locally in my area…However, these beauties are currently, out my budget…“Sigh” what was I to do, I couldn’t get them out of my mind!


To my delight!... Another blogger came to  the rescue!.... Jessica Cramer of Designer Sweet Spot.com  had done a similar post on this subject matter and created her own unique garden stone head planter using a foam head … Thanks to her, I now have one too!  

Miss Betty Bling,  Meet Miss April Rose........


Photo Credit: Miss Jessica Cramer of Designers Sweet Spot
Photo Credit: Vetsy of Vetsy's View


For instructions on how to create your own Miss Betty Bling

For instructions on how to create your own.. Miss April Rose,  read the following pages below: 


Supplies:  Paint brush for applying  the Megikote foam primer, Rustoleum  American Accent Spray,  Krylon Crystal Clear Satin Spray, floral foam knife or any cutting tool that you can use safely to hollow the head.   I swopped out the

 ( Krylon Make it Stone Metallic spray)  that Jessica used for the Rustoleum American Accent Stone Spray…because I wanted my foam planter to have more texture. 


The first Step: is to apply the Megikote Primer,  than let it dry...One can speed up the time by placing the head next to a fan.... The instructions on the bottle warns Not to use a blow dryer!


 The fan method worked great.... It was dry in less than 30 minutes or so.....I than sprayed it with the Rustoleum American Accent Stone spray.... Ooops!  I stood to close to her head when I sprayed her and got bumpy results....

   
Below:  I had to stand at least 2 feet or more to get the right results... I didn't follow directions.. I sprayed her a second time and got better results...When she was dry I applied the  KRYLON CRYSTAL CLEARSATIN SPRAY


NOTE:  leave the top of her head unpainted, Jessica drew a 6'' circle on top with a compass, you can also use a 6'' flower pot.. see photo below.. this is done to make it  easier to remove and excavate  later.


Below: I used a marker and a   6.3'' flower pot to trace and mark the cavity.


I could not find a floral foam knife any where! None of my craft stores had any..So I resorted to using a   Wall Board Saw..... BAD IDEA!  This tools works better on what it's designed for... A Wall!


            I  found a couple of blades and alternated between the two...They worked a lot better..


I kept scraping my way through using straight and circular motions.... TAKE YOUR TIME, MOVE SLOWLY AND CAREFULLY WITH THIS STEP!!  to avoid injuries!

Since the neck of the head already has a hole in it.... all i needed to do was to poke the foam out from the inside...


Below: I decided to use a potato bag in place of a flower pot  because I could not get a pot to sit in the head correctly... I could have chosen to place dirt and plants inside of the cavity.... but I wanted a quicker option to swop a plant out if I wanted to change it...


And... Wah-la!   Miss April Rose is complete.... Almost.. 

I'm indecisive about my plant choice. I love the color and form of  Purslane...
 ( It's related to the Moss Rose)  but read that I'll have to watch out for the seeds during the end of the summer or they'll spread like weeds... I can maintain it by cutting them back or taking care to remove the seeds.... But for now they adorn her head.... 


I just Love her! Thank you Miss Cramer and thank you visitors for stopping by and leaving a comment. If you should decide to make these garden planters,  please stop by and link your project, I would love to see what You.... have created!    Thanks!


  Photo: of Miss April Rose by Vetsy of Vetsy's View


Thursday, May 2, 2013

One of my favorite pastimes


Above:   This bold little Warbler sat long enough for me to snap this photo right on my balcony

One of my favorite past times is bird watching... When I lived in Michigan I attracted several birds to my feeders...The Red Cardinal, Gold and Purple finches, Blue Jays, Chickadee's and even the common House sparrow  although... A pain in the butt! was a source of entertainment.


House Sparrows and a male Red Cardinal

 My  Weigela shrub attracted the same nesting cardinal pair three or more years in a row.. I would watch and worry about their babies as they flew from their nest,  and  now open to prey like our neighboring cats...


 later on..... I learned to hand feed Chicadee's with my nieces,  if you missed that blog click here for the link  http://vetsysview.blogspot.com/2010/08/birds-and-butterfly.html

I enjoyed  feeding the birds but in 2011 I ran out of steam...feeding birds became an expensive endeavor and a  big chore! The cheaper the seed the bigger the mess!  I later purchased  bird seed mixes that included  the kernels only... It cut down on the mess!..... but cost a lot more!


Above: A photo I took in 2011... Sunflower seed hulls carpet the grass below my bird feeder.. The sparrows would consume a pound of birdseed in a single day!   UUUGGG!
 
You can see why I thought that feeding birds was more trouble than it's worth.... When I move south the only specie I would bother to attract is the hummingbird.... It cost less and no seeds are involved... ''sigh"

But one morning here in my new state of South Carolina.. I opened  my balcony door and heard a familiar sound... "Chik a.dee..dee..dee..dee...


Above: Instead of throwing out my Christmas tree, I  decided to use it as a perch for the birds.. This little Chicka-dee fell in love with it..

A big smile came to my face as I sat and listened .. dare I go back on my word?  I dared myself and did. Off I went to the store to purchase birdseed,  I can't just sit and listen to the chirps and the songs of birds, I have to see them as well.......

Above:  Plants and bird feeders share space on my small balcony...So far I have attracted  more than 10 species of bird, some are regular visitors while others are just passing through.. 


 The Carolina Wren feeds upside down on a bird seed bell..


Above: A male cardinal spies out the bird feeders


Above : A Downy Woodpecker which is the smallest and I think, is the curtest of all the other species of woodpeckers


Above:  A  pair of Purple finches eat from a plate.......


  A Gold finch...


I believe this large robin like bird is a Wood thrush but I'm not certain... the photo isn't very clear because I'm trying to take pictures through my balcony door..


Below: A Cat bird feeds from a feeder I made from a flower pot.....


I have just learned that like the Mockingbird.. the Cat bird too, can mimic many other species of bird... I was fascinated by a Youtube video uploaded by Greg Budney..and decided to share it on my post...
Credits: Greg Budney and the Lab of Ornithology

Uploaded on May 6, 2010   
A remarkable Gray Catbird mimics dozens of bird species (and a frog too!) in northern California. Listen as Greg Budney, audio curator at the Macaulay Library, dissects the recording and notes each snippet of mimicked song.


Thank you for stopping by.... Do you have a favorite bird?